So, I've kind of
been fascinated with this stuff. I did some research (as you do) and found that
it was originally a Japanese paper used in paper crafting like origami and even
used to create statues of Buddha (who knew?!). But it's also something on the costly
side, so till recently, I've kind of put off buying any to do anything with. Then
Target came out with some (not super good quality, but the stuff works),
Michaels got a bunch of new types in (somewhat cheaper) and then Pick Your Plum had an awesome deal going where they
were closer to $1.50 a roll rather than $4.00 - and this is the good stuff.
So, now that I had
some on hand, I was actually at a loss as to what to do with it first. Then I
remembered seeing this great little tutorial (and yes, I totally snagged that free
printable quote) and thought 'I could totally do that', and you know me, I
totally did.
I already had the
washi tape on hand, and the paint (and paint brush, duh) so all I needed was a
frame. And as luck would have it, Michaels was having one of their fun sales
where tons of stuff is 60% off, so I grabbed two (one is for a later project), and for a grand total of $4 I was ready to rock and roll.
So, quick breakdown of what I used:
So, quick breakdown of what I used:
- Washi tape (of course) in purple
- Wooden frame
- White paint and paint brush
- Exacto Knife (for cleaning up the edges)
- Mod Podge and brush (for sealing it and keeping everything in place
 |
| The 'fun stuff' |
I grabbed my white
paint (to make the frame look more finished and as washi tape is translucent it
helps to have a more solid background to enhance the colors and pattern) and
brush and just painted the frame - I gave it two light coats, so more of a
white washing than an actual painting.
Once it had dried,
I started applying the washi tape - I started at the sides first, and worked in
from both sides, so that when I got to the middle, I could adjust the tape to
fit.
 |
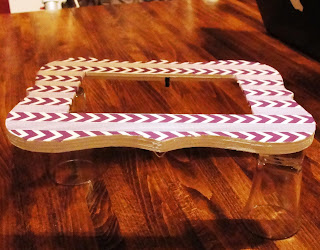
| Why yes, those are shot glasses... |
When I was happy
with how it looked, I flipped it over and trimmed up the sides with an Exacto
Knife (I didn't do the insides as the way the frame was made it look a little
funky, so I trimmed them up also), and then I gave it two coats of Mod Podge to
seal it (you know how I love me some Mod Podge).
 |
| Almost done |
Let it sit
overnight, put the picture in it and ta-da!! Quick and simple upgrade to an
ordinary frame.
Now that I've done
this one, I'm thinking some of our old frames could do with some washi love
(and I can hear M sigh from here). And maybe a potential Mother's Day gift or two in there...
 |
| Ta-da!! (don't you just love the owl? My talented friend Sierra made that) |
So beautiful
people, what do you think? Did I nail this one?
K

TOTALLY nailed it! So stinking cute! Now I have something to spend time on other than cleaning. Woo hoo!
ReplyDeleteAw thanks. And I will not be held responsible for you not cleaning...you use washi tape at your own risk.
DeleteSo cute! I love DIY projects!
ReplyDeleteThanks Christie - me too. Now, if I could only master the art of sewing, I'd be a happy camper.
DeleteLove it!! I'm embarrassed to admit I haven't delved into the washi tape waters yet...you have inspired me to try!
ReplyDeleteDo it!! I'm totally obsessed now. I see things I could 'washi' all the time now....kind of scary actually.
Delete